Showing posts with label review. Show all posts

Tuesday, June 12, 2012

Review: The Balm Mary Lou-Manizer

After signing up for my first beauty subscription box (Birchbox) last July and starting this blog in January I've been learning a lot of about makeup, application, and techniques. I watched a video on contouring and highlighting last fall. I had a bronzer that worked great for contouring, but no product that would work well as a highlighter. After just a little searching I was set on getting theBalm's Mary-Lou Manizer. I saved up my Birchbox points and here it is!

theBalm's Mary-Lou Manizer
Mary-Lou Manizer without primer


A look without any cheek products


The addition of blush applied to apples of cheeks


The look with blush and bronzer applied in hollow of cheek bone, jawline, and sides of nose


The COMPLETE look with blush, bronzer, and Mary-Lou Manizer applied above cheek bones, above brows, center of nose, cupid's bow, and center of forehead

Review:
Mary-Lou Manizer is theBalm's famous highlighter. I love how the name is a play on the fact that a highlighter acts illuminate! So what is a highlighter? A highlighter is a beauty product that is brighter and lighter than your normal skin tone and should have some shimmer in it. It is used to brighten certain areas of your face and draw extra attention to those areas. Plus, it gives you a glamorous, polished appearance. It is also used to dramatize angles created with contouring. And contouring helps enhance your natural bone structured helping to thin out and accentuate what you've already got.

Many celebrities don't leave the house without having their face perfectly contoured/highlighted. My favorite example is Kim Kardashian. She always has a bright glow and perfect bone structure. You may think what you like of her, but you really can't deny that she is gorgeous. Although I do think she goes a little too heavy on the eye makeup and lashes. Using Kim Kardashian as an example, TheUntrendyGirl.com made an amazing tutorial photo of how to properly contour and highlight.

With those shapes in mind I myself got to work using an angled powder brush. I don't contour or highlight as heavily as in the tutorial photo. Instead I focus primarily on giving shape to my giant nose, adding a little plump to my upper lip, and bringing out the angles of my jaw and cheekbones. Until this year, I only ever wore a little blush, but boy does contouring and highlighting do wonders! My face loses 5lbs in an instant and in photos my face doesn't look pancake flat and dull.

Mary-Lou Manizer may be the only highlighter I'll ever try. And I mean that. Mary-Lou Manizer is a pressed shimmer powder that can be used as a highlighter, an all over shimmer (body/face), or as an eyeshadow. The powder is a honey champagne color that has very finely milled shimmer that diffuses light. The color is extremely neutral. I am very fair and pink, but I think this shade would work would well with any skin color or tone. The shimmer catches the light adding a subtle glow and making anyone's skin look younger and softer. I don't even realize that it is a shimmer, instead it is just an instant glow. You couldn't ever pinpoint a single piece of glitter nor is it so much shimmer that you feel like you are prepping for your Broadway opening. One swipe and your face perks up.

In the photos above I wanted to show you the full 'transformation.' The blush adds a necessary addition of rosey pink to my cheeks after I neutralized out all the red tones in my face with my foundation. The bronzer helps to define my faceline and nose. I think it really does an amazing job at thinning out my wide nose! Then with the addition of the highlighter I think my face just looks completed. I may have a bit of a sheen from the start at some of the most common highlighting regions, but it looks just like I am shiny. Once I add the highlighter my shine turns into a true natural looking, glow. And the definition of my nose is even more noticeable because the contrast of the highlighter against the contouring. My upper lip also looks a tad bit fuller. It may all be subtle, but I love the enhancement.

You do have to be careful of where you apply it, but that goes with any highlighter. You don't want to highlight your entire forehead or all over your nose or you'll go back to looking shiny. Nor do you want to highlight any noticeable zits, it just makes the imperfection even more noticeable.

This product is also highly pigmented! A little goes a long way! I only need to lightly touch my brush to the powder to have enough product for an everyday look. I've been using this product for almost four months now and I can still see the original pattern etched onto the majority of the surface. I have no doubt that this highlighter could last me a few years. Yes, a few years. I mean it. It seems like theBalm realized that a product that lasts so long needs a sturdy case. Many bloggers and reviewers have said the case is metal but to me it feels like any old hard plastic. Yet it is very sturdy and feels like it will hold up. Plus, the adorable pin up gal guilty of womanizing theme is too cute.

I really can't think of a single negative. It shows that a little research before buying a new product makes a difference. With so many options it can be hard to weed through it all. But this was a clear winner. And in my book, the best.

TheBalm's Mary-Lou Manizer retails for $24 and is worth every penny. Take a look at theBalm's website at: www.thebalm.com

The bottom line: Neutral, honey tone that works with all skin colors; Finely milled shimmer that adds a subtle glow; A little goes a long way; May be expensive, but will last for years.  5/5

Have your tried theBalm's Mary-Lou Manizer? Is it your favorite highlighter? Let me know in the comments below!

Wednesday, March 28, 2012

Review: blinc mascara

I'm a night owl and a procrastinator. Put the two together and you can imagine that I have many sleepless nights. Ever since undergrad I have dreamed of a truly waterproof, smudge-proof mascara that I could wear  on crazy study days and flop right into bed. I know, no need to lecture me about how you should always take off your face and how quick it would be to remove my makeup; some days I could barely walk back to my dorm without falling asleep. But even if I did take the time to remove it I'd still end up with some sort of mascara raccoon eyes.

Fast forward to my August 2011 Birchbox, well technically rewind. I received a little sample of blinc mascara. Birchbox told me that 'this game-changing mascara encases your lashes in a thin tube of water-resistant formula that won't smudge, smear, or run. Thanks to Birchbox, my life changed that day (and end dramatic corniness).


before

after (2 coats to top and bottom lashes)

blinc Mascara (black)
blinc (formerly known as Kiss Me) is the original acrylic mascara that surrounds your lashes with water and budge proof mascara tubes. Most mascaras paint the lashes and when made wet will reform into their original liquid, whereas blinc solidifies and cannot be chemically reversed back to a liquid. This means that they are not only water-proof but they cannot run, smudge, clump, or flake. Even if you cry or rub your eyes. The only way to get them off is with BOTH water and gentle rubbing, not either or. 

Can you believe a mascara does all of that? I couldn't. But I am now a believer! Every single thing they claim actually is true.  I can wear this stuff for hours and hours and it does not budge or smudge. The only time I have ever had my makeup smudge was when I go to the chiropractor and my eyes tear just slightly while Im laying face down. I can cry all I want and no issues with mascara running. I can rub my allergy ridden eyes without smudge. And even if I accidentally fall asleep with my makeup on, I no longer am plagued by raccoon eyes. Plus, the mascara does not weigh down my eyelashes. Most mascaras feel awful to me because they make my heavy lashes droop enough to alter my vision/blinking.  Not blinc, I have no issues with any drooping. The mascara is also a perfect choice for anyone with sensitive eyes. Most mascaras will flake off into eyes or penetrate into the skin and irritate the eye and skin, but blinc will not flake into my eyes nor smudge on my glasses. 

There is definitely a learning curve for applying blinc. Obviously you use the same application method. The major difference is that blinc is a bit more liquid-y than other mascaras. At first I would accidentally get it all of my eye. But what is great, if you do make a mistake, don't try and rub it off, wait for it to fully dry and you can just dab a damp q-tip at the spot and not ruin all your makeup. Another difference is the time frame. You have to beat the clock before the liquid dries into tubes; once the tubes form it will be set and you cannot build anymore. You have two minutes to apply coats until you are happy with the volume and length. I generally only need two coats for daily wear. I will apply the first layer for both eyes and go back and finish the second.

I really do love the brush. It seems somewhat common, but the shape is almost like a ellipsed figure 8. This shape makes it really easy to apply to the bottom lashes without having to worry about gunking it on or accidentally getting it everywhere. This is the first mascara that I have ever felt comfortable applying to my bottom lashes. I never realized how long my bottom lashes were since most of them are bleach blonde. The only problem I have with the brush is that sometimes it is hard to separate out lashes effectively. But that is what a comb is for.

If you plan on curling your eyelashes, I'd recommend curling BEFORE you apply your mascara. The tubes will form around the shape of your eyelash, if you wait the tube will not want to curl much. But if you curl first, the tube will form around the contoured lash. It is a bonus because it acts like a cast on your lash keeping your curl longer.

Because the tubes are added around your lash, it will always add length and volume. I think the volume and length that I've been able to achieve is great for my daytime looks, but lacks for a night-time dramatic look. I mean in the before and after you can clearly see that my lashes are thicker and longer. But, if I want more drama I can use a dramatic normal mascara and then apply blinc over it. That way my look will be sealed with the smudge-free, waterproof benefits of blinc.

My only real issues with the mascara is that it seems like the product gets thicker and goopier as it ages. When I'm halfway done with the bottle I find that I do have some issues with clumps. I'm normally able to get them cleaned up and out by using a comb or a dry q-tip to pick up excess. And you have to be very careful with keeping the rim of the container clean of the mascara. If you do get the rim dirty, the dried mascara will act like glue and cause the rubber stopper to glue itself to the top of the wand. It happened to me once and it looked like my mascara blew up. But, the next day it unglued itself and I didnt have any trouble again.

Blinc mascara retails for $24 and is available in 6 shades. Take a look at the blinc website at: www.blincinc.com

The bottom line: Waterproof, Smudge proof,  Comes off only when you decide, Doesn't weigh lashes down, Decent lengthening for a great daytime look, Some issue with clumping if too much mascara on brush, Have to remember to curl before you apply, Have to be careful with mascara getting on rim of bottle. 4.5/5

Have you tried blinc mascara? What do you think of the acrylic tube technology? Has it replaced your old mascara? Let me know in the comments below!

Saturday, March 10, 2012

Review: Urban Decay 24/7 Glide-On Shadow Pencil Stash

The minute I saw HauteLook was having an Urban Decay deal I knew I would be spending big bucks. I picked up a few items including the 24/7 Glide-On Shadow Pencil Stash Set. I've heard amazing things about the entire Urban Decay 24/7 line and couldn't resist adding these gorgeous colors to my collection.

Urban Decay 24/7 Glide-On Shadow Pencil Stash


Juju all over eye, Rehab as thick liner beneath black eyeliner, and Sin in crease/highlight

Sin all over eye, Rehab on inner half of eye, and Clash as thick liner beneath black eyeliner

Review:
I originally bought these just to buy them, not really knowing anything about the product or any reviews. Yes, I know I have an online shopping addiction, but I'm so thankful that I do!  I was drawn to them because of the brown/gold colors which tend to be my favorite eye color. Urban Decay describes these as a jumbo, more versatile version of their popular 24/7 Glide-on Eye Pencils. The original pencils are much thinner and more geared for lining. Whereas the shadow pencils can be used for all-over eye color but still can be sharpened to a precise point for lining. The shadow pencils are normally sold individually but I received a bought a set of 5 shades. The only differences between the set and the normal shadow pencils are that the set pencils weight .022oz less (22% less) and they come with plastic, clear caps vs plastic, metal-finish caps. 

The Pencil stash includes 5 pencils:
     -Clash: bright turquoise with silver sparkle
     -Delinquent: dark puple with bright purple sparkle
     -Rehab: shimmer reddish/brown taupe
     -Juju: frosted shimmer taupe
     -Sin: shimmer champagne

What I love is that the colors that glide on are exactly what you see on the packaging. They are so true to color it isn't even funny. Often with gold,s you may buy what you think is a soft taupe but ends up with a red/bronze. I was worried that I wouldn't have any use for Clash, but it is so fun to use as a liner or to add a pop of color at your tear duct. Delinquent is a very, royal purple. It is deep, but the sparkle adds the perfect amount of glitz. It'd be another great liner or as added contour in the crease line.  My favorites are as I expected, the golds. Rehab is a reddish brown taupe that is not too dark that it couldn't be used as an all over eye color. Juju is my favorite of all the colors. It reminds me of the 2nd lightest cube in The Body Shop Shimmer Cube, which was my first real eyeshadow purchase years and years ago. Sin is a well known shade from Urban Decay, it can be found as a potion primer, in the NAKED palettes, the latest Book of Shadows, and the list goes on. And the shadow pencil version of the shade does not disappoint. It is such a beautiful champagne! The color will compliment any skin color and brighten your eyes.

So the colors are perfect, but how do they apply? The name says it all. They truly glide on in an instant. The formula is creamier than I could ever imagine. But feels as light as can be without any awkward sticking. You barely need to use any pressure to have perfect, even application. Plus, they are opaque with one swipe. The pigmentations is absolutely incredible, the colors in the swatches are from one just one layer without any primer. To get that kind of color pay off from most eyeshadow it takes layers, good brushes, wet application, etc. Not with these. On my lids the color is just as intense.

What I love most about these shadow pencils is that they are waterproof, crease proof, and smudge proof. I did a 24 hour swatch test and they held up to the challenge! They lasted through an entire day on my arm, an entire night's sleep, and only started to fade when I was in shower with the water directly on the swatches. I had to scrub to actually get the color to fully wear off (although, they easily are removed with eye makeup remover). I couldn't believe it! What you may not believe is that I took the photos of the bottom eye look (using the teal Clash) at the end of a 15 hour, humid day! No primer, no smudge, barely any fading, and still shimmering just like when I applied. The only issue with the staying power is that if you want to blend and layer shades you have to act QUICK! UD sells a special blending brush made for these pencils, but Im too cheap. I found it easiest to just use my fingers to help blend. The stay power is more important to me due to my crazy schedule and the few minutes I have to get put together.

I may have found my new favorite eyeshadows. These are easy to travel with, take up little space in my growing makeup collection, and no need to worry about fading or fall out. Every day I've been grabbing the pencils. Im in love.

Individual 24/7 Glide-On Shadow Pencil's retail for $20 and are available in 12 colors. Take a look at the colors at: www.urbandecay.com

The 24/7 Glide-On Shadow Pencil Stash retail for $34, but is currently on sale for $12 on the UD website. Get it while it lasts at: www.urbandecay.com

The bottom line: Gorgeous, shimmery colors; Creamy, smooth application; Highly pigmented; Water, crease, and smudge proof; Very little fading; Color lasts for hours and hours; Quick and easy application. 5/5

Wednesday, March 7, 2012

Free Pair of Glasses from Coastal.com

Yeah, you heard me...FREE! Coastal.com is a contact and eyeglasses online website that has an offer where your first pair of glasses is free (use promo code: FIRSTPAIRFREE) and you only have to pay for shipping and handling. The company wants you to feel confident ordering from an online eyeglass website and to show you how easy it is.

I've looked at a lot of eyeglass websites that have very, very cheap quality products and I was expecting the same when I started looking at the glasses on Coastal, but I was wrong. They offer many well known brand names, such as: Cynthia Rowley, Espirit, Bongo, Converse, and more. They do offer luxury brands, but those products are not included in the free promo. And thankfully, they are easily labeled as not being part of any sale/promo. The majority of the frames that I liked were from their own brand names, but the quality of the products still looked stellar. The prices range from about $30-$100. And no matter the price, all of the standard glasses are included in the promo!

I had a blast deciding what I wanted. Ever since I saw Ali Wong on the Chelsea Lately Round Table back in December I have wanted to be her. No joke. And that includes her glasses. To really appreciate the glasses, take a look at the full-size image. I love the semi-cat eye shape, the strong bridge that fades into nothing. It is just such a great shape! And who can resist such a classic, vintage style. So my Coastal.com pick was my own version of Ali's glasses for me!


What I ended up on was Derek Cardigan's 7010 in Grey Haze. Derek Cardigan is a brand I've never heard of and from my searches I have only found the glasses on Coastal's website. The line is vintage inspired and 'reflect Derek's joie de vivre philosophy on fashion and life. Derek Cardigan eyewear evokes the spirit of a swinging by-gone-age brought right up-to-date full of color, whimsy, joy, and style' (Do I just buy things that are described in someway as joie de vivre?) 7010 are browline eyeglasses that were ever so popular in the 1950s.

The frame is made of acetate and silver metal. I chose the Grey Haze color which is a translucent grey tortoise style. I love that they define my brows but are not over powering as a fully opaque black would have been. Plus, if you look closely you will notice they are massively geeky. Check out the multiplication and division signs, and on the sides the equal signs. That sold me. There were multiple browline styles, but it was a done deal.


Once I got my eyeglass prescription from my optometrist I was ready to order.
Note: Your contact lens prescription is not the same as your eyeglass prescription! Because contacts sit on top of your eyes whereas eyeglasses sit a few cms away from your eyes they have different focal lengths. Call your optometrist and they will be able to give you the correct prescription and your pupil distance. If you have an astigmatism you will also need your cylinder power and axis numbers.

The website recommended me to upgrade to a higher quality lens, but even though my prescription is somewhat high (-3.5 and -4) I decided to go with the standard free lens. You can also change the lenses to sunglasses or transition lenses (although I do not believe these are part of the free promo) and you can add UV protection, scratch resistant coating, and anti-reflective coating. The coatings each are an extra +$9.95 so I did not take advantage of them.

I received my lenses just 3 business days after I ordered by Fedex. The glasses came with the case, a cleaning cloth, and a lens tightener. I was so happy when I first laid eyes on my new glasses, they are gorgeous! The lenses were obviously high quality and crafted carefully. The frame feels durable and looks just as in the picture, well even more shiny and beautiful. They fit my face perfectly, are really comfortable because they have spring hinges and adjustable nose pads. But if you find yours don't fit perfect, take them to lenscrafters and they will do an adjustment for free. I did find the lenses took some adjusting on my eyes. But now that I've had them for a few weeks they no longer bother my eyes and I see well. One thing I wish I had done is paid the extra $10 for the anti-glare. Any light causes a glare to show up, good luck using flash! I'm going to stop by Lenscrafters and ask if they will add the anti-glare coating. It is worth the extra $10!

I have gotten many compliments on my glasses! Even from my 60 year old photography professor! They pair very well with my style. They definitely add a whimsy and fun feel to any of my looks. I have a heart-shaped face and they do not overpower my big forehead or accentuate it at all. Plus, I think the fact that the majority of the frame is thin, silver it allows me to shine through! I originally bought these to be an extra pair to wear when Im just around the house or laying in bed watching TV, but I almost think I like this style more than my Ray Bans!

top: Gap
necklace: Jewelmint
earrings: F21

Coastal's website is a bitch glitchy. I couldn't use the try on view and the website is slow. It took forever to search through all the glasses since the pages would every so often freeze up. But in total, I am VERY satisfied and will probably get getting another pair from Coastals in the future. I would definitely recommend taking a look at the Coastal website. Don't forget your first pair is free with promo code (FIRSTPAIRFREE), excluding any additions and shipping ($9.95). So for $10 I have a pair of glasses that beat out my $300 pair!

Have you ordered from Coastal's before? What is your favorite style of glasses? Let me know what you think in the comments!

Friday, February 24, 2012

Review: Kat Von D True Romance Eye Palette in Truth

I have to admit, I am not a fan of Kat Von D. As in the person. What I've seen of her on tv she seems whiny and somewhat an attention and drama whore. Plus, Im a Sandra Bullock lover and anybody who associates with Jesse James these days is not high in my book.

I never thought of buying her make-up line due to my opinions of her. Why fatten her wallet? But my friend found this palette in the sale bins at our local Sephora for only $15. Hells yes! We both picked up the last palettes. My packaging was all ripped up, but the shadows were not touched, so I grabbed this baby right up.

Kat Von D True Romance Eye Palette in Truth


*I apologize the swatches or flipped from what the case shows. I'll make sure in the future that this doesn't happen. I would fix it but I already merged all the text layers to the only photos I have of the swatches. My bad.

Review:
Kat Von D is a Sephora Exclusive collection of deluxe beauty products created by the tattoo artist. From what I could find this palette collection was inspired by unlocking the forbidden, opening up the soul, and refining beauty. Which is why the packaging has key graphics. I really like the palette packaging. It feels solid, has a sold locking clasp, and it is a reasonable size. I could easily travel with this or slip it into my purse and not have to worry about shadow seeping out. The palette comes with two double-ended applicator brushes that really seem useless to me. I used one for one of the swatch colors just because I didn't want that cream all over my new eyeshadow brush. 

Truth includes 8 eyeshadow colors:
      -Sugar Skull: shimmer vanilla
      -Long Distance: shimmer citron
      -Snake Eyes: semi-shimmer lime
      -Finland: shimmer aqua gold cream
      -Prague: silky deep plum
      -Galeano: shimmer pale lilac
      -Rehab: shimmer golden tan
      -Sister: matte peach

The first set of swatches were taken with dry application over Sephora Collection Perfecting Primer. The second set of swatches were taken with wet application (using MAC Fix+ on brush) over Sephora Collection Perfecting Primer.

The colors themselves are all quite lovely. These colors allow you to have a sweet, natural day look or a dark, smokey sexy night look or a bright and vibrant, playful look. Lots of versatility. I've found a purpose for all of the purple shades. Sister makes a great all-over base for color, I love using rehab over my underbrow region, Galeano in my crease and outer lid, and Prague makes for a perfect liner. I've always stuck to purples, browns, and metallics so the additions of the green shades is difficult, but Im finding ways. I used Snake Eyes has a lower lash liner to add a nice contrast and brightness against my darker lids. And Long Distance looks great in the crease line with gold shades on the lids and Sugar Skull has a highlighter.  But I can tell you now my top three are: Prague, Galeano, and Snake Eyes.

The majority of the colors are highly pigmented (excluding: Sugar Skull, Finland, and Sister). It takes a single swipe of Prague to line both of my eyes. I couldn't believe how much color swiped onto my lids, even without primer the color payoff is incredible. Although Sugar Skull and Sister are not as pigmented, you sort of want to be able to build on your base and highlighter. It makes them more versatile. You would think that the shades would have a creamy, thick formula to have such great color payoff; but unfortunately, the shadows are really crumbly and not well-pressed. I feel like however long this palette should last will be cut in half since each brush sweep wastes so much shadow. It is best to apply the shades with a wet brush to help reduce the amount of flaking and to ensure they don't get all over your face while applying. Sister and Prague are the only colors that apply/change consistencies when applied wet. Prague becomes like a water-based paint, very silky smooth, exact lines. Sister becomes clumpy and cakey. I find the wear is pretty fantastic. I don't feel it fades, creases, or smudges! Even Snake Eyes, the light lime lasted all day.

One of the most gorgeous colors in the palette is the aqua/gold shade, Finland. Sadly, it is a complete piece of crap! The cream is dry, hard as a rock, feels waxy, and applies uneven and clumpy and is sheer. It took maybe 10-15 layers to get the swatches. And it never ended up looking even. It is sad since this is such a pretty color. I'll probably still try and use it because I love the color so much. But, I'd have to have time to apply this color. I wish it wasn't cream based and was the same formula as the others.

This exact palette is no longer available on the Sephora website, but you can find it available on ebay. The original price for this palette was $34, but I paid $15.

If you are interested in trying a Kat Von D True Romance eye palette they are available exclusively at Sephora. Take a look at the current Kat Von D collection at www.sephora.com.

The bottom line: Solid packaging, Pretty, versatile colors, Highly pigmented shades, Amazing wear. But flaky and crumbly, plus the cream shadow's formula is terrible.  3.5/5

Thursday, February 23, 2012

Review: Biofreeze Pain Relieving Gel

This is as good a time as any to review my new favorite pain reliever. And by a good time, I mean a bad time for running because I am sadly plagued by shin pain. Runners, don't ever mess around with shin pain!

I received multiple samples of Biofreeze from the front desk guy at my gym. As a runner it is extremely important to practice proper RICE:

  • Rest
  • Ice
  • Compression
  • Elevation

Rest: If your body is screaming at you to stop what you are doing, listen and rest!! If you continue to work your tired muscles or your injured body it is possible you will cause your body more harm and it may lead you to chronic problems and longer recovery periods.

Ice: The area of pain/injury will create a lot of heat from the inflammatory response. Ice reduces inflammation, reduces pain temporarily, and just feels darn good on that hot skin. Limit icing to only 15 minute applications, too long can be detrimental because it will limit blood flow that helps recovery.

Compression: You want to reduce swelling because it can delay healing. Use an elastic bandage to compress the swollen areas. But if you feel it throb or it cuts off circulation, bad news bears.

Elevation: Swelling is also reduced by elevating the area of pain. You want the injured part of your body to be raised above the level of your heart. It increases the venous return of blood and therefore increases circulation.

I also massage the area of injury to prevent scar tissue from forming, as scar tissue can cause chronic pain in the future due to inadequate blood flow and movement. And also slowly stretch the area.

So why do I love Biofreeze?

Biofreeze Pain Relieving Gel


I find it extremely irritating to sit as still as possible while trying to keep the ice on the spot of my pain. Or if Im using an ice pack, the ice pack doesn't extend the length of my injury. And even if cover my skin somehow the ice still makes my skin red as can be. Biofreeze's active ingredient is menthol. Menthol is a natural compound found in mint plants. Menthol relieves pain by numbing your pain receptors in the area it is applied and causes a cooling sensation created by a signal sent to your brain by menthol that your body interprets as coldness. All this equates to a great pain reliever for aches and pains. Biofreeze is great for sore backs, strains and sprains, arthritis, and any other body soreness. 

All you have to do is slap on some of this gel, rub the gel until it is fully slathered on and wait for the cooling, pain relief to kick in. The amount shown in the photo was enough to slather up my sore shins. You can feel the effects of Biofreeze almost instantly and there have been studies proven that Biofreeze works quicker than ice. Plus it also has been shown to work deeper than ice since it promotes vasodilation in the area reducing skin barriers. 

You should limit yourself to only 4 applications a day, too much can be a bad thing because of the fact that the coldness reduces blood flow and therefore if you keep it too cold for too long, the body wont be able to promote healing. I suspect that the fact that the skin is cooled and then goes back to normal temperature in a time period that even though blood flow is initially slowed, that it will increase once the area has adjusted. But I'm not a doctor and only able to speculate. 

Either way, I like Biofreeze better than ice. I get to control the area of application, I can move around while Im cooling my muscles, and I dont get freezer burned skin. 

Biofreeze comes in a gel, like what I have purchased, but it also comes as a spray, wipes, roll-on, and a non-colored gel. My 4oz Biofreeze gel retails for ~$20. But I was able to snag a 2-pack on Amazon for $18. You can read more about Biofreeze at www.biofreeze.com

The bottom line: all-natural product, easy to apply, quick pain relief, faster and deeper pain relief than ice, and amazing cooling sensation. 5/5

Monday, February 20, 2012

Review: e.l.f. Mineral Moisturizing Lip Tint SPF 8

All last month I had been waiting for the best e.l.f. coupon so that I could buy brushes galore. I got so excited when I got a coupon for 10 free mineral eyeshadows with a purchase of $25 or more. I got up to $20 worth and then couldn't figure out what else to pick. This lip tint was was one of those last items I decided to pick up.

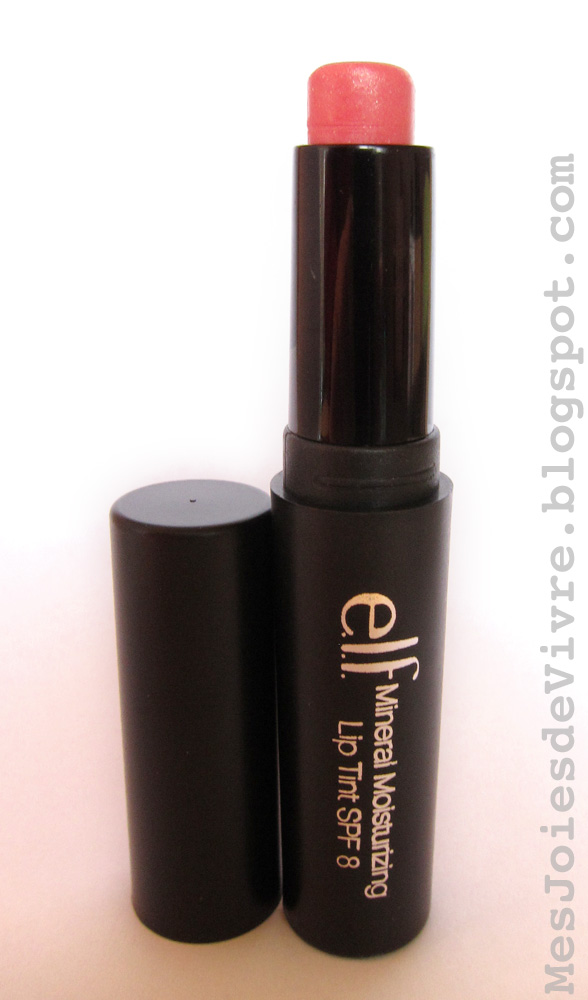
e.l.f. Mineral Moisturizing Lip Tint SPF 8 (Blush)


Review:
e.l.f.'s Mineral Moisturizing Lip Tints have the consistency of a lip balm with a nice color pay off. I'm actually really surprised by how creamy and how packed it is with moisture! The hydration can be credited to the fact that these tints are made with Coconut, Jojoba oils, and Vitamin E. My lips feel amazing and soft when I wear this; to the point I have to remind myself I look ridiculous smacking my lips together feeling how smooth they are. The buttery softness wears off in maybe 1-2 hours, but my lips still feel smooth a good number of hours later. Although, you will need to reapply often to keep the color. I'm also thankful for the SPF protection, can't ever protect your skin enough from the sun! I have to say that the flavor/smell kind of seeps into my mouth. It isn't bad, but what I would expect an edible crayon to taste like...

The color is exactly what I was expecting. Blush is a nice sweet pink that really just brightens up your lips. I don't really see too much of a difference in my lip color but it adds a nice soft shine. (I have to add that I am sick so I am puffy and congested in the photo. So sexy.) I don't mind the little pigmentation because it makes for a great lip treatment to quickly apply and not have to worry about smudge or mirror application. Some reviews on the e.l.f. website do state that the other colors are not completely true-to-color, but just take a look at the reviews if you plan on ordering. 

I have to say I adore the container. It isn't too tall nor is it really fat, it is the perfect size to fit nicely in your skinniest legging jeans without making you look like you have a growth on your hip or butt. Plus, I like that twisting mechanism is like a lipstick container and inside the tube. I somehow always wind up my chapsticks while they are in my jean pockets, to the point they become giant blobs. 

e.l.f. states that these lip tints diminish the appearance of fine lines and wrinkles around the mouth. I don't think I can testify to that yet. But really? That seems far fetched for a $3 lip tint. But I didn't order this looking for a miracle...just for a pretty tint to hydrate my lips. And it does exactly that. 

e.l.f. Mineral Moisturizing Lip Tints retail for $3.00 and are available in 8 colors. Take a look at the shades at: www.eyeslipsface.com

The bottom line: Cheap, Silky smooth lips, Sheer color coverage, Sweet container, and Acceptable Wear. 4/5

Thursday, February 9, 2012

Review: Anastasia Perfect Brow Pencil

As a kid I had bushy, uneven, and sparsely spaced eyebrows. Gorgeous, eh? I was very conscious of them and started tweezing once I knew I could. But I realized that tweezing any of my brows made me look like I had no eyebrows, even more gorgeous. I randomly was walking around a Sephora 6 years ago and the sales associate asked me if she would let me do my brows. Embarrassing, you bet. But I got a great consult and help on using a brow pencil to fake the brows I'd never have.

Just yesterday I ran out of my beloved LORAC creamy brown pencil that I got on that visit. It lasted 6 years (2 years of using it every day), pretty amazing. The color I got originally was when my hair was bleach blonde, so I figured I'd try a new shade at the store to determine if I should really stay with it. I went to 5 different Sephoras in 3 different states and none of the stores I went to carried LORAC! It looks like only a store at the mega-giant mall in the suburbs carries the line. Since I was desperate this weekend I decided to try a new brand, Anastasia.

Anastasia has sooo many brow products. They have pencils, inked pens, cream sticks, powders, eyebrow stenciles, etc. I decided to stick with a pencil. Unfortunately the store I went to was not very helpful, they said they couldn't do a consult for the particular product and would not make a new Blonde colored tester for me even though they didn't have one out. Boo. So trying to decide to go with Blonde or Stawburn was a headache. The Blonde looked too ashy for me, and my hair is really a dark blonde with gold. So Im stuck in between blonde and brunette. I ended up choosing the Stawburn since it was similar to the color I already had, a little red tint to the brown coloring that would help to bring out the gold in my hair.  Anyways, here is my review and swatches of Anastasia's Perfect Brow Pencil.

Anastasia Perfect Brow Pencil (Strawburn)


Before and after application:

Review:
First, I want to apologize for such terrible swatches. The lightening was so blue! I had to do all sorts of Photoshop fun to get the color back to what it really looks like. But I figure that is what is important, not how perfect the photo looks. Glad we agree. Moving on...

Anastasia's Perfect Brow Pencil has a silk smooth formula. It is so creamy and smooth that it can be used on wet or dry skin. And so creamy that you don't need to apply it very hard. I apply the pencil, with light strokes starting at the inner eye and move outward. You want to follow the natural direction of the hair growth. Then I fill in a bit more where I need it and perfect the edges. As you can see this product lives up to its claims. It fills in, still looks natural, and it took me only seconds to apply. It makes a HUGE difference to me. I feel more confident, and it brightens and enlarges my eyes!

I think the color is nice. It is the perfect shade for any dirty blonde. I love that it brings out my golden/red highlights and helps to keep my hair from looking muddy. If you are in-between shades you can buy two different colors and blend them. If I had the money I'd definitely buy the Blonde shade to add some highlights. Buut Im not that picky, and I think I picked the perfect color.

The pencil's brow brush feels amazing. It is stiff enough that it will really work well to help blend and shape your brows. Plus, both ends have metal caps to cover the brush and pencil when they are not in use. Perfect if you are putting this in your make-up bag for travel.

I kind of think that the lack of LORAC in stores may have been a blessing. I think I like this pencil better! I use less pressure using the Anastasia pencil than I did with the LORAC. Maybe this bad boy will last me even longer! I'm very happy with my purchase.

Anastasia's Perfect Brow Pencils retail for $22 and are available in 6 shades. Take a look at the shades at: http://anastasia.net/product.php?productid=16138

The bottom line: Amazingly smooth application, natural look without much blending, great color that blends with natural hair, all-day long wear. In other words, it is way worth the $22 price tag! 5/5

Monday, February 6, 2012

Review: NYX soft matte lip cream

I have never used any NYX products in the past, but after seeing their name here and there over the past few months I decided to try a few different products. First, I chose the soft matte lip cream because I found a coupon for 50% off each bought on the NYX website. Surprisingly it was a coupon from the MyGlam Dec bag (although the coupon officially has expired, boo). Many shades many enticed me but I didn't want to buy too many colors since I wasn't sure how well the product would work. So I went to both extremes: neutral (Stockholm) and bright (Amsterdam). 


The many times I have tried to take just lip photos, my lips look funny, uneven, and grumpy...so I figured for lips I will just do a complete head shot. Hello world!

NYX soft matte lip cream in Amsterdam:

NYX soft matte lip cream in Stockholm:

Review
NYX soft matte lip creams are just that...a cream. There is really no way else to describe them. NYX sells 11 colors varying from bright reds, to bright pinks, and many neutrals in between. I had the hardest time deciding what colors to get, so I decided to go for a sexy red (Amsterdam) and a neutral color that I figured would match my skin (Stockholm). The other shades are also named after major cities around the globe. 

They glide on like a lip gloss but thankfully are not sticky. The color is nice and pigmented; I only applied one coat of Amsterdam to achieve the look I wanted and two of Stockholm. What really suprised me when I opened up the bottle was the smell. They are SCENTED, although they smell good I dont want to salivate from the smell of my lip product. Like a vanilla latte or cake batter. The cream applies like butter but will slowly set, maybe took around 5 minutes for the cream to feel completely dry. Thankfully, the smell disappears as they set.  Once the color sets they are matte.

NYX states that the creams are highly durable and moisturizing, so what is my verdict? I found that Amsterdam wore off in just a few hours, well it turned into a softer, bright stain on my lips. But if I put gloss over it, the color would transfer to my gloss brush. Stockholm had very long lasting wear, but the color was so minimal to begin with. I tend to have problems with massive loss of color from saliva, which I think is beyond hideous, but color wears off mostly evenly. I dont look a mess a few hours later, just a little more refined. Now were the soft matte lip cream's moisturizing. Not really? My lips felt dry and looked dry. I'd recommend putting on a thick coating of lip moisturizer before applying. Or add a layer of gloss on top to keep them moisturized while you are wearing (but that defeats the whole matte thing, eh?). 

Color-wise I was very disappointed with Stockholm, the photo from the website does not match the product swatch at all. My swatch is obviously very pink toned, whereas the website shows Stockholm being more yellow. I wanted a color to make my lips almost concealer-like, but this almost matches my lip color perfectly. Amsterdam is pretty much what I expected, just a little brighter. I'm hesitant to try other shades if the website swatches are off for other colors.

NYX Soft Matte Lip Cream's retail for $6.00 and are available in 11 colors. Take a look at the shades at: nyxcosmetics.com

The bottom line: Cheap, Pigmented matte color, Acceptable wear, but somewhat drying. 3/5

Have you tried NYX soft matte lip creams before? What do you think about them? What is your favorite shade? Let me know in the comments.


Related Posts Plugin for WordPress, Blogger...